
This guide provides a basic introduction to using DSLR (Digital Single-Lens Reflex) cameras for photography and videography. Much of the advice applies to any DSLR camera, but specific settings and buttons refer to the Canon EOS Rebel SL3. These cameras are available for free checkout to all UMW faculty, staff, and students at the Hurley Convergence Center (HCC) Info Desk.
Camera Accessories #
One of the most impactful ways to improve your photography or videography is with some simple accessories. Tripods, lights, microphones, and appropriate lenses can tremendously improve a project with very little effort, and will set you up for success from the start.
Tripods #
Whether you are shooting photos or video, stabilizing your camera will improve your project immensely, and is the easiest way to make your results look more professional.
Tripods are available for free checkout to all UMW faculty, staff, and students at the Hurley Convergence Center (HCC) Info Desk.
Microphones #
If you are doing a video project, a microphone is the absolute best way to improve the quality of the end result. The microphone on the camera itself is not sufficient for most uses, especially at distances over a few feet.
A small shotgun microphone is included in every Camera Kit checked out at the HCC Info Desk. This mic can be attached to the top of the camera (via the “shoe,” or clip above the viewfinder) and plugged into the mic port on the side. It offers greatly improved audio over the built-in microphone, but still struggles at distances over five feet, or if your camera is not pointed directly at the subject.
For longer distances or when recording outside, a lapel mic is preferable. The Audio Kits available at the HCC Info desk include a microphone that can be clipped to your subject and a wireless receiver that can be attached to top of the camera (via the shoe) and plugged into the mic port on the side.
Lapel microphone Audio Kits are available for free checkout to all UMW faculty, staff, and students at the Hurley Convergence Center (HCC) Info Desk.
Lights #
Effective lighting can make a huge difference in photo and video quality. Light your subject from the front, either directly ahead or, ideally, at a 30 degree angle from both sides. Ensure that there are not overpowering light sources behind your subject (like a bright lamp or a window on a sunny day).
To better control the lighting in an environment, you can use a small light attached to the camera’s shoe, or larger lights on stands to the left and right of your camera.
Both small and large light kits are available for free checkout to all UMW faculty, staff, and students at the Hurley Convergence Center (HCC) Info Desk.
Lenses #
The size of a camera’s lens determines the maximum and minimum focal length that a camera is capable of. This impacts how effectively the camera can zoom and how much control you have over what is in and out of focus. There are countless lens options, but a few standards are:
- 50mm – A fixed lens (a lens that cannot zoom in and out) that offers a perspective similar to human vision. Good for close-ups, portraits, and interviews where you want the subject to be in focus but the background to be out of focus (also known as “bokeh”)
- 18-55mm – A zoom lens that offers a balance of range and focus. This is the default lens for HCC Camera Kits.
- 75-300mm – A long-range zoom, also called a “telephoto” lens. These are great when you can’t be close to your subject but want to see detail, such as in wildlife or sports photography.
18-55mm lenses come in every HCC Camera Kit. 50mm and 75-300mm lenses are available as add-ons to any Camera Kit. Checkout is free to all UMW faculty, staff, and students at the Hurley Convergence Center (HCC) Info Desk.
Camera Basics #
The functionality in this section applies to both photo and video projects. Advice that only applies to video or photography can be found in the Photography and Videography sections below.
Power Dial #
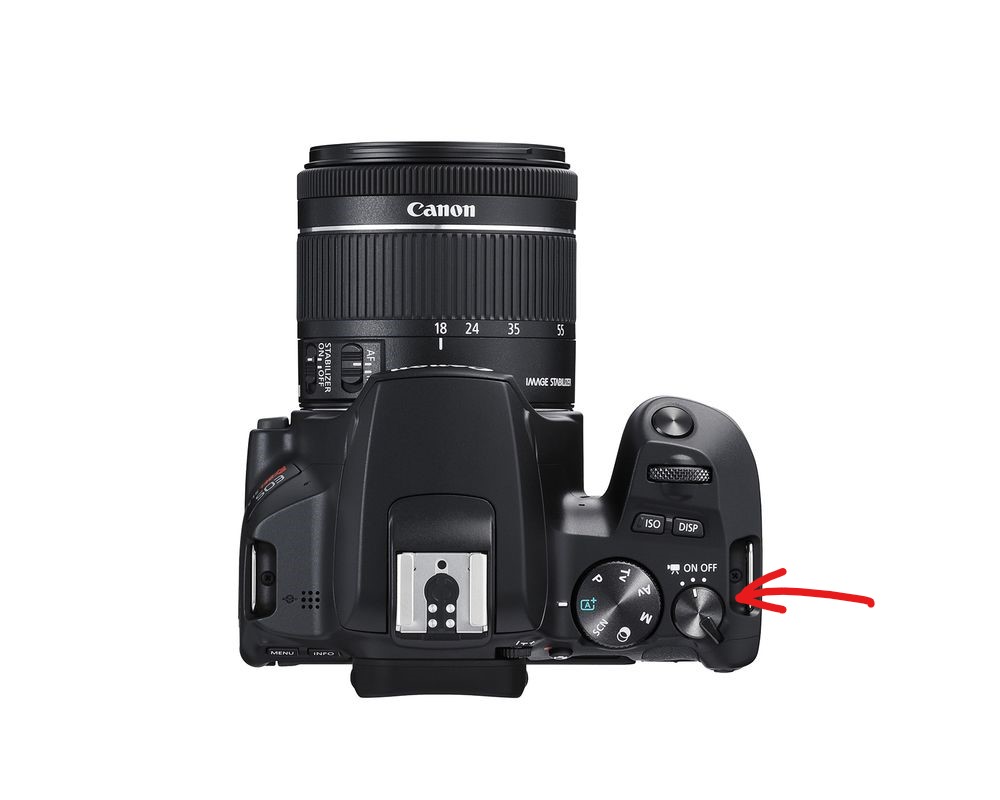
The dial on the top right of the camera allows you to:
- Turn the camera Off
- Turn the camera On
- Set the camera to Video mode (🎥 symbol)
The camera functions differently in On and Video mode, so make sure to select the correct option from the start.
Shooting Settings #
Before starting a photo or video shoot, it is advisable to set your camera to your preferred file size and type. You can do this using the Menu button on the rear of the camera in the top left corner.
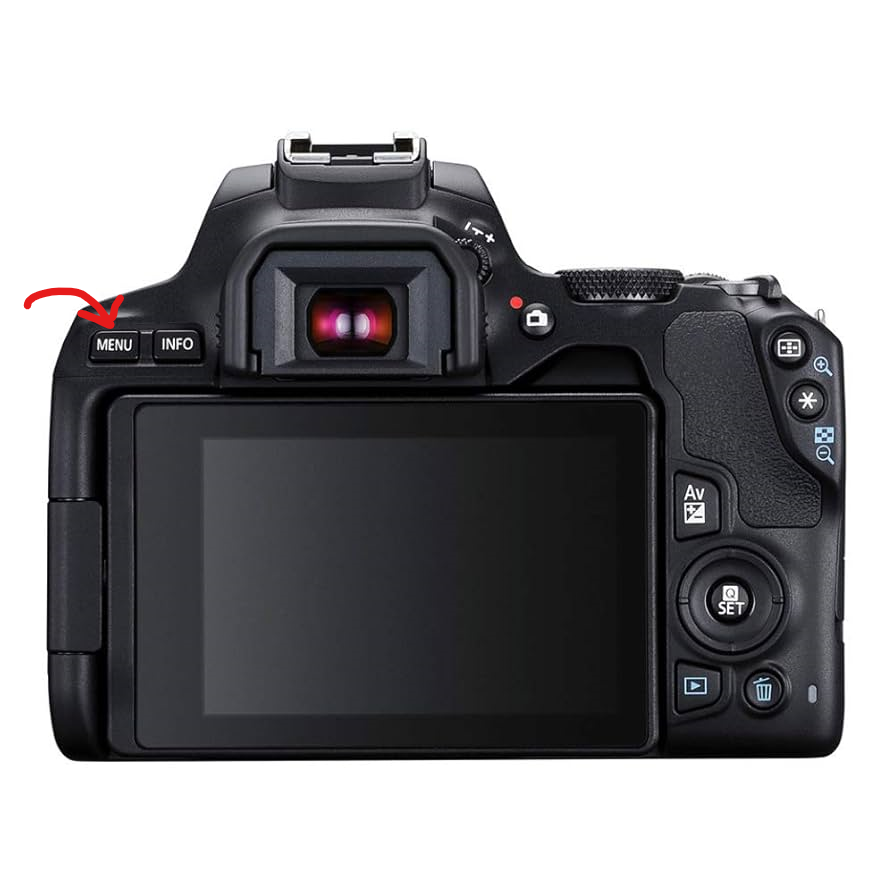
To adjust settings, you will first need to set the appropriate mode on the Power Dial (On for photos or the 🎥 icon for videos). Then you can select Shooting Settings from the menu to adjust file size and type.
Image Quality (Photo Mode)
In the Image quality menu, you can set the camera to save RAW images, JPEG images, or both.
RAW images are uncompressed high-quality images, but the files are very large. If you plan to do complex editing to your photos, you may want to enable RAW. If you do not intend to do much editing, it is usually better to set this to the – setting to optimize storage capacity and improve image load time.
JPEG images are compressed, meaning some image data is lost. This file type can nonetheless be very high quality, and is suitable for most print and digital photo applications. There are various JPEG options on the Canon DSLR, but the Fine Large (curved arc symbol + L) meets most needs.
Recording Size (Video Mode)
In the Movie rec. size menu, you can set the camera to record in several different resolutions and frame rates. Resolution impacts the size and quality of the video, while frame rate impacts how smooth movement in the video appears. The recommended settings are:
FHD 29.97P (Full HD 1920×1080 resolution, 29.97 frames per second) – Best for getting high-quality, natural looking videos. Choose the one without the downward arrow symbol for the least compression/highest quality.
4K 23.98P (4K 3840×2160 resolution, 23.98 frames per second) – The highest quality available on the Canon SL3. This gives you the most options in the editing process, allowing cropping and digital zoom without a noticeable drop in video quality. The files are very large, however, so it is not recommended if this kind of editing is not needed.
FHD 59.94 (Full HD 1920×1080 resolution, 59.94 frames per second) – The higher frame rate in this second will make action in the video appear very smooth, but this is sometimes off-putting to viewers (sometimes called the “Soap Opera effect”). It is useful for slow motion videos or situations where the viewer needs to perceive extremely precise motion, but otherwise is not recommended.
Shutter Button vs. Record Button #
There is a shutter button on the front of the camera that can be used to take photos.
The shutter button can be pressed halfway down to activate Auto Focus on a subject at the center of the image, or pressed fully down to take a picture. This functionality can be used to keep a subject in focus when they are not in the center of the frame. To do this, prese the button partially down while the subject is in the center of the frame, then move the camera to place the subject elsewhere in the frame before pressing the button fully.
When in video mode, the shutter button is disabled.
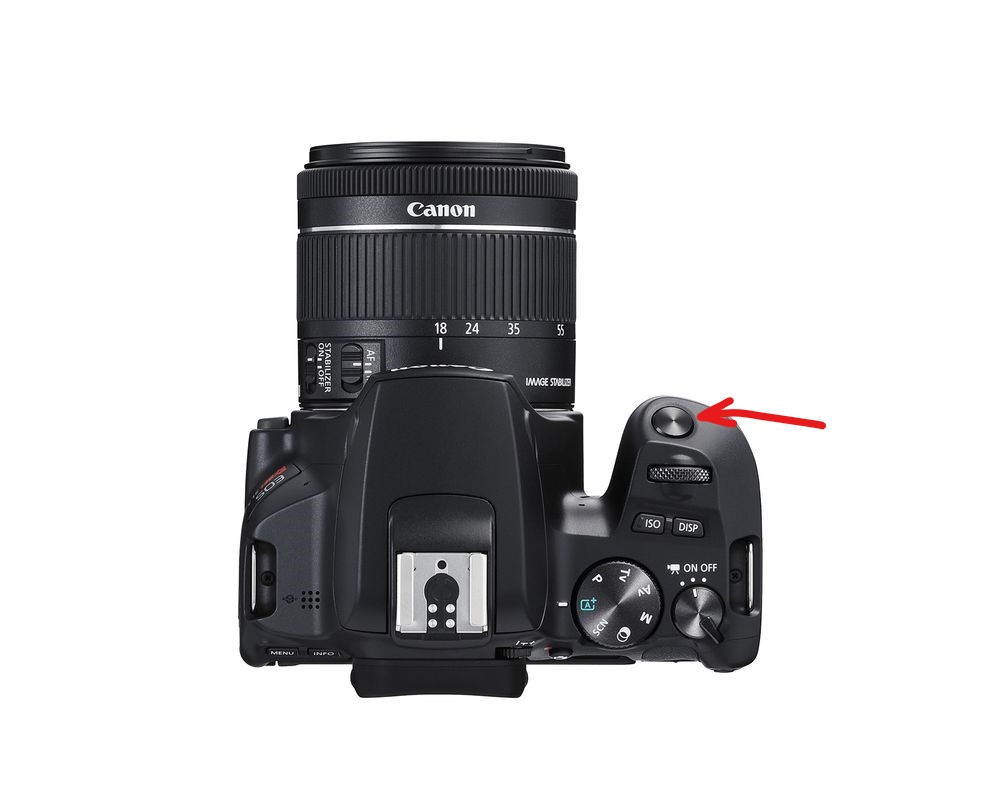
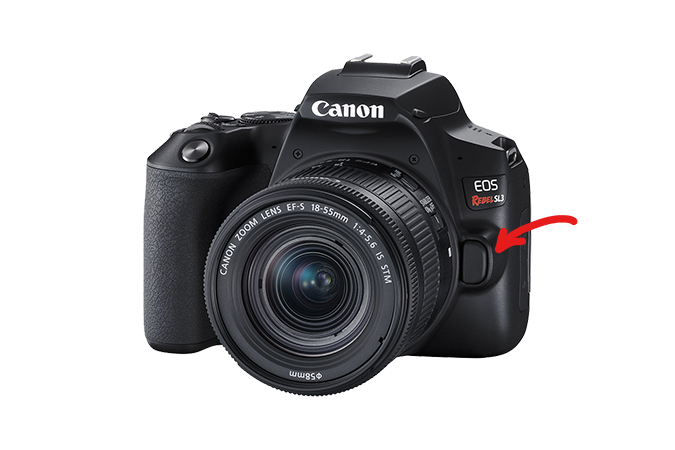
This button does not start a video recording. To record video, set the Power Dial to video mode and press the button located to the right of the viewfinder with the camera icon (📷) and nearby red circle. The camera must be in Video mode to start a recording.
Zoom & Focus #
Canon DSLRs can be set to Auto Focus (AF) or Manual Focus (MF) using the switch located at the base of the lens.

When the lens is set to manual focus, focus can be adjusted using the small ring at the end of a lens. When set to Auto Focus, this ring does nothing.
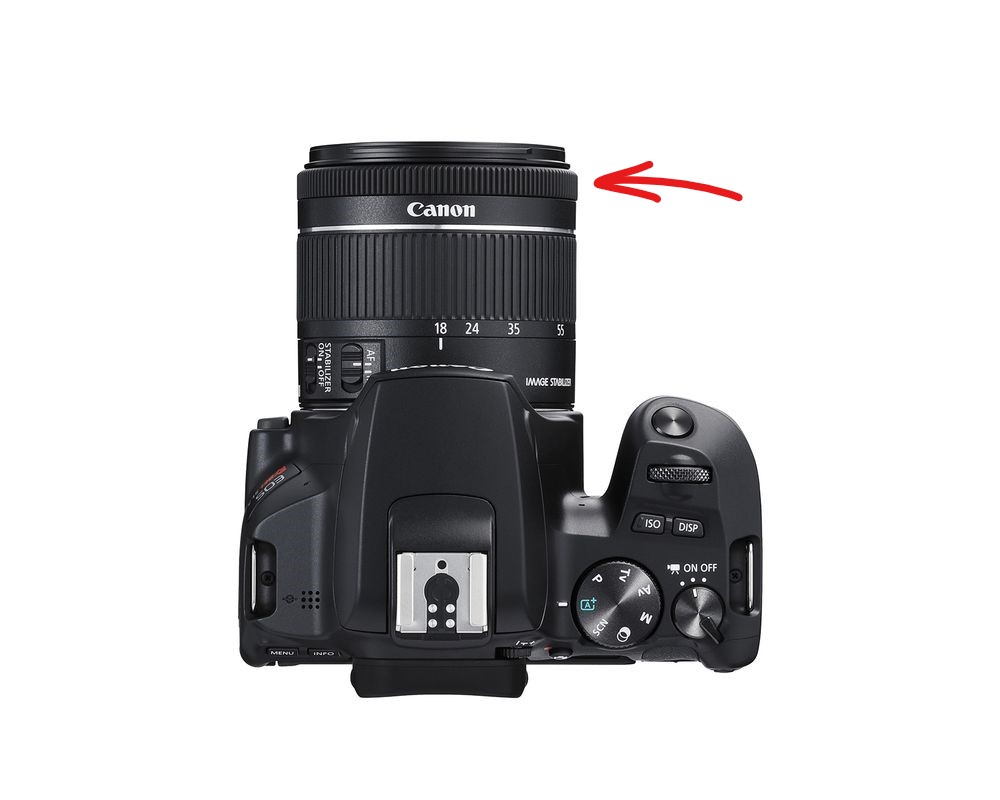
On zoom lenses, zoom can be adjusted with the large ring on the middle of the lens.
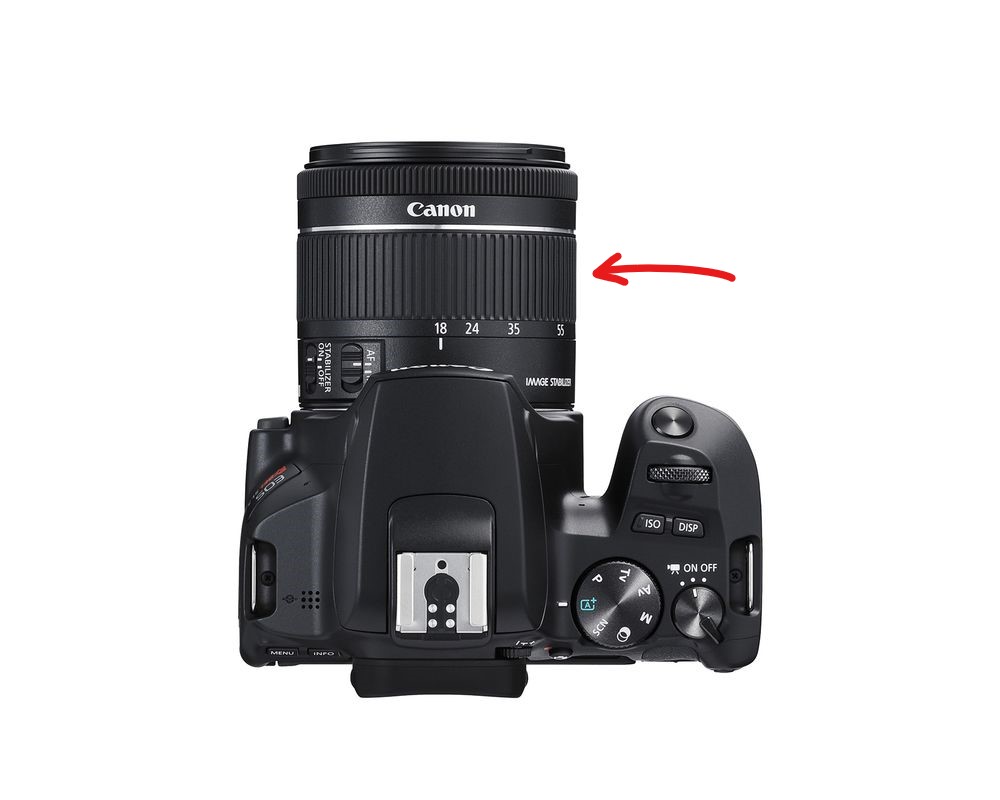
The 18-55mm and 75-300mm lenses available at the HCC Info Desk are zoom lenses. The 50mm lenses are not, and so have no zoom ring.
Swapping Lenses
Lenses can be swapped using the lens release button on the front of the camera body near the base of the lens.
While holding the lens release button, turn the lens counter clockwise until it lifts easily from the camera body.
To install a new lens, align the symbol on the base of the lens (either a white square or red dot) with the same symbol on the camera body. Turn the lens until you hear a click.
Make sure to place the lens protector cap on the removed lens to prevent dust and damage to the lens.
See the video below for a demonstration of the process.
Camera Modes #
The dial to the left of the Power Dial can be used to set the Camera Mode. The modes are, from least complex/least control to most complex/most control:
- A+ (Automatic+) – This is the simplest mode, ideal for beginners. The camera will automatically adjust settings based on the current environment.
- P (Program) – A slightly more advanced mode that allows you to select some simple options like darker vs. brighter and focus mode in addition to some automation from the camera.
- SCN (Scene) – Select from a few modes like Sport, Portrait, and Landscape.
- Overlapping Circles Symbol (Creative Filters) – Overlay filters on your image. This is not recommended since you can always apply filters after taking the photograph of video using photo and video editing software.
- Tv, Av (Shutter Priority, Aperture Priority) – These modes allow you to set one element of the Exposure Triangle, and then other settings will be adjusted automatically around that.
- M (Manual) – Set all the settings of your camera manually.
Automatic+ mode is a great place to start for beginners, and the Scene options can be a good step up from there. If you are going for a specific look with your photos or video, you may need to dive into Manual adjustment. This guide will go into more detail about the various manual settings below.
Manual Mode #
Manual mode may seem daunting, but with a little understanding of the Exposure Triangle and a consistent process it can be very rewarding.
The Exposure Triangle
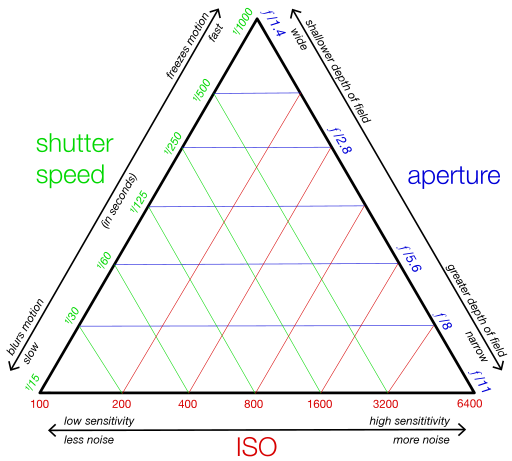
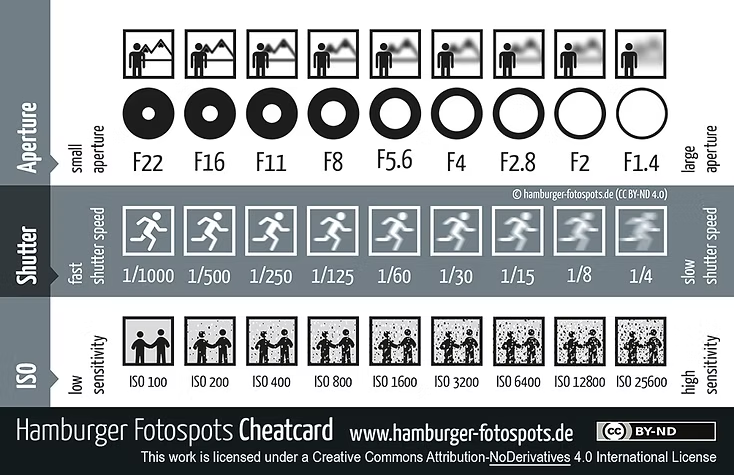
The Exposure Triangle is a way to visualize the relationship between three camera settings: Shutter Speed, Aperture, and ISO.
Each of these settings impacts how bright or dark the resulting photo or video appears, but they each have additional functionality as well.
Shutter Speed
Shutter speed is the length of time the camera’s shutter remains open to expose the sensor to light, affecting both the brightness of the image and the ability to freeze or blur motion. Measured in seconds or fractions of a second (e.g., 1/1000, 1/60, 1″, 30″). Faster speeds freeze motion; slower speeds can create motion blur.
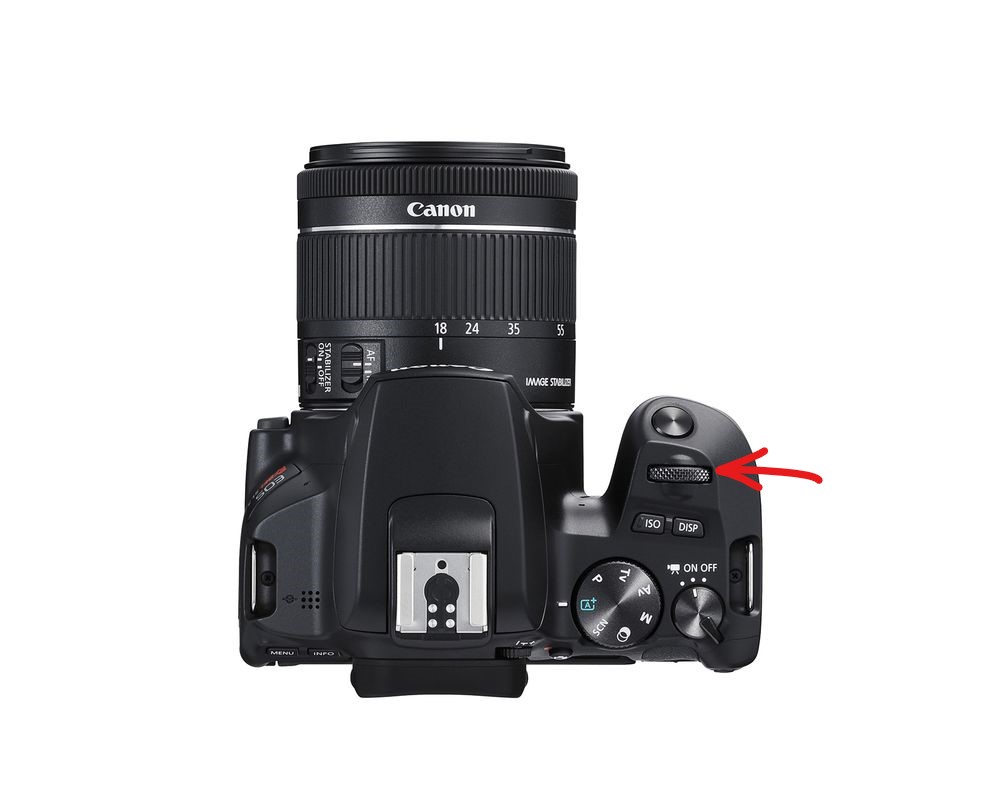
On the Canon DSLR, you can adjust shutter speed using the dial near the shutter button while in Manual mode.
Aperture
Aperture is the adjustable opening in a camera lens that controls how much light enters the camera and affects the depth of field in an image. Measured in f-stops (e.g., f/1.8, f/4, f/16). Lower f-numbers mean a wider opening (more light, shallower depth of field), while higher f-numbers mean a narrower opening (less light, deeper depth of field).
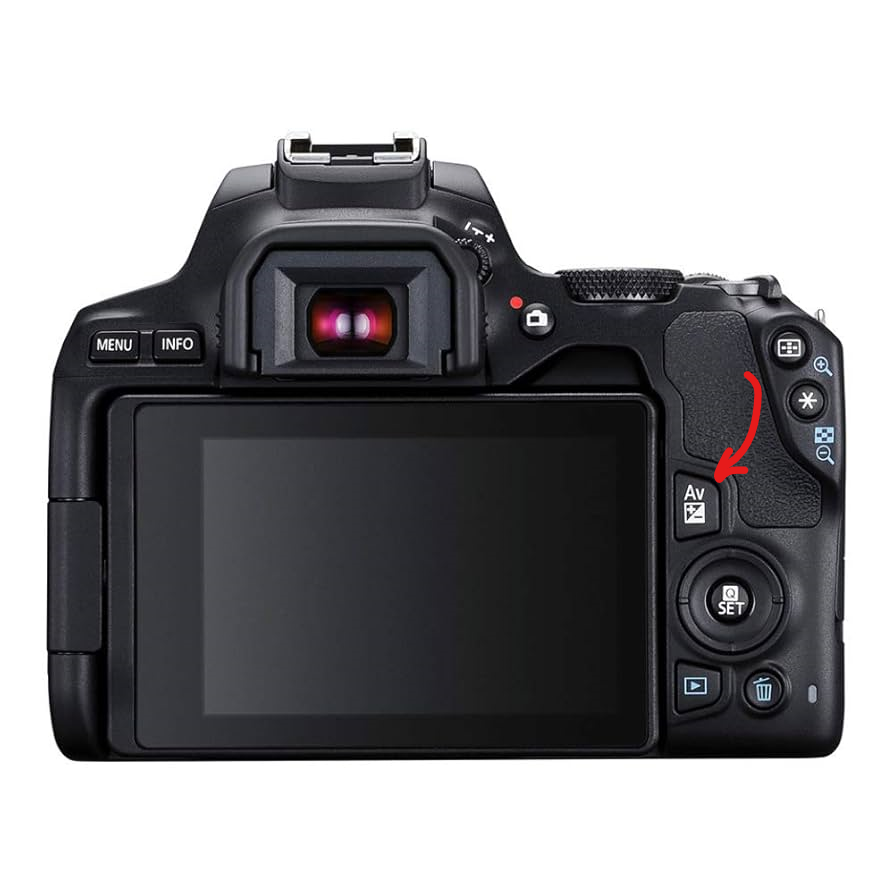
On the Canon DSLR, you can adjust aperture by holding the AV button on the back of the camera and using the dial near the shutter button while in Manual mode.
ISO
ISO is the camera sensor’s sensitivity to light, with higher ISO values allowing for brighter images in low light but potentially introducing more digital noise. Measured in ISO numbers (e.g., ISO 100, 400, 1600, 3200). Lower ISO means less sensitivity (cleaner image), higher ISO means more sensitivity (brighter image with more noise).
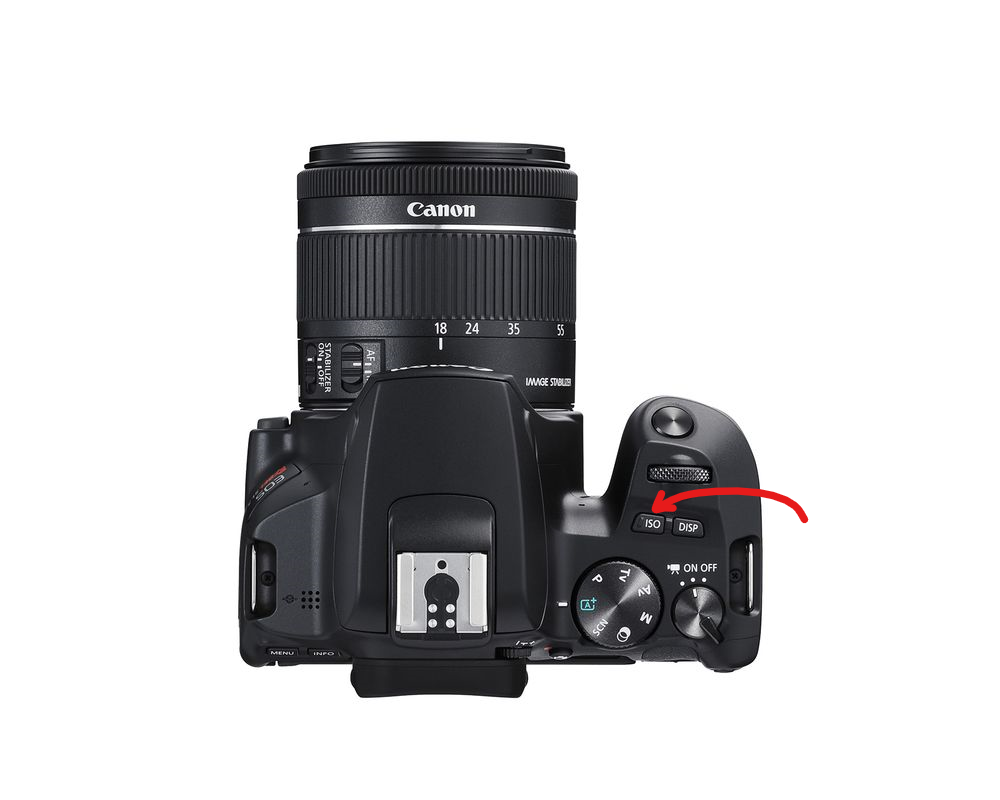
On the Canon DSLR, you can adjust ISO by pressing the ISO button on the top of the camera and using the dial near the shutter button while in Manual mode.
Workflow
When working in Manual mode, it is recommended to identify which setting is your priority and set that element first. Generally this will be aperture if you want to prioritize depth of field (blurry or sharp background) or shutter speed if you want to prioritize motion blur.
ISO should usually be adjust last to achieved the desired level of brightness in the final image.
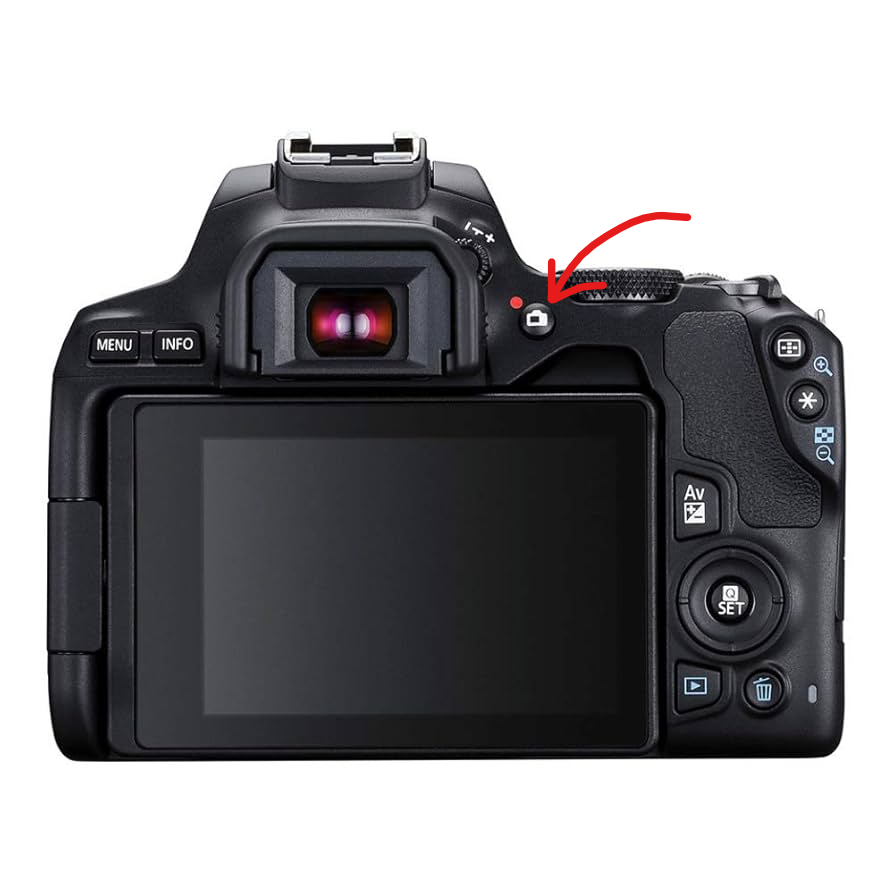
Live Mode #
Live Mode is a feature on Canon DSLRs that allows you to adjust settings using the touch screen. You will see the effects of your adjustments immediately on the screen.
Enable live mode by pressing the button located to the right of the viewfinder with the camera icon (📷).
Additional Resources #
Video Accessibility Guide – Check out our tips and resources on how to make your video projects more accessible.
Getting Started with Video Projects Guide – Resources and basic tips for filming and editing videos.
Photo Editing Tool Guides – Software recommendations and basic tips for editing photos.
Want More Help? #
Book an HCC Equipment Training with a consultant at the DKC. We would love to help you with your video or photography projects!