


Transcript
(Intro music)
Ally: Welcome to the Digital Creator Podcast, the show where we spotlight students working on cool digital projects. I’m Ally, a consultant at the Digital Knowledge Center, where we empower students to be digital creators. Today’s guest learned skills in 3D design to continue his work with printing protein models for the purpose of educating others on their structures and functions within the body.
Stephen: Hello everyone. My name is Steven Zdgiebloski. I’m a senior here at UMW. I’m doing a biochemistry major and plan to graduate in the spring of 2025.
Ally: So, could you describe your project for us a little bit and then kind of talk about how you connected with the DKC to do it.
Stephen: Yeah, for sure. So, my project is essentially going to be taking molecular representations and trying to print them in 3D with the 3D printers that we have here at the DKC. I was introduced to the DKC through Doctor Agrawal, who is one of the biology teachers here at UMW. And she told me about it because when one of the classes that I was in of hers, which was biochemistry of proteins, we were actually trying to print them. And I got really interested in it and I thought it was really cool and I thought that we could go more and be able to show off these proteins in a different way through using like CAD and stuff like that so.
Ally: Awesome. Cool. So, just walk us through a little bit like the process of making these different models and sort of how you work through it to get to the final product.
Stephen: Yeah. So, essentially there’s a website online. It’s called the protein database and this is where I get all the STL files, which is essentially just the files that you use for 3D printing, and you can get all of them there and it’s all free, open source, and they’re really, really accurate models of these proteins. You can really find almost any of them. There’s – I think there’s thousands and thousands of different proteins on there. But you can easily access these STL files, and using free CAD resources, you can take these files and put them in CAD and you can make these little bonds between them and you can have different attachments. You can make a pedestal for them. You can add in these different subunits that will slide into the models that you make and all this different type of stuff and it makes it super easy and it’s all free which was really, really great for me so.
Ally: Yeah. So, kind of on this similar topic of like things you’re adding in, like what alterations have you had to make?
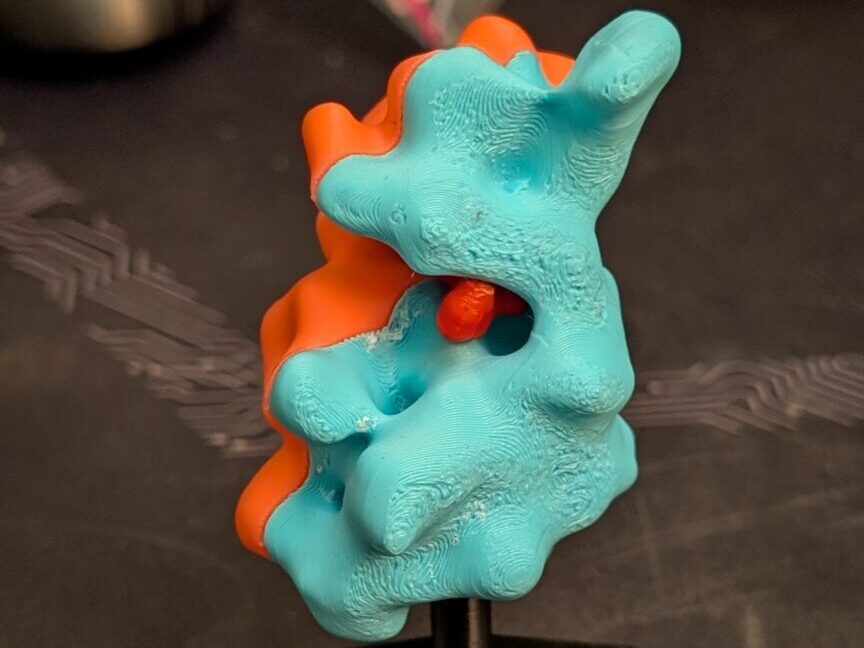
Stephen: I’ll give an example. Just for the last one that I did was with hemoglobin and hemoglobin is a 4-subunit molecule protein. It’s in our blood and it carries the oxygen. And essentially what I was able to do is put it in CAD and I can make these pegs between the four different subunits so that if you, for example, were a teacher and you wanted to use the model for teaching, you can show it off. And, although I will admit, it does not look like much. But initially it doesn’t really look like hemoglobin. But you can take it apart and you can show that there’s these four different subunits that make up this one whole molecule, and the subunits will have differences between them – Alpha and beta subunits for hemoglobin. And you can also make little pockets into the molecule for, for example, when oxygen goes in. It changes confirmation. And there’s a bunch of other really sciency things that you can do that I haven’t done yet that I would really love to do, and I probably will do by the end of my project. But right now, I’ve really managed to get the model on a pedestal. I’ve been able to make little points between them that are connected, so you can take them apart and put them back together. And then, I’ve also been able to do the pockets where for hemoglobin as an example, there’s what’s called the protoporphryn ring in there. And that’s where iron binds the oxygen. And I was able to make these little discs where you can put them in there and it really shows off that – because in class you learn about how the oxygen attaches to it, but you don’t really fully conceptualize how it’s part of the molecule and how oxygen goes in there.
Ally: Right.
Stephen: And I think that as a teaching resource, I think they could be really valuable.
Ally: Yeah, that’s super cool. So, where are you in the process, would you say?
Stephen: I would say I’m way farther than I thought I was going to get. Towards the middle of this, I was getting a little discouraged because I was having some issues with the printer, but I managed to get past that and I’m actually probably about 75% of the way there. The only real extras that I want to do is I want to be able to add on different interactions. Like, for example, if I had hemoglobin, I would have another molecule – it’s called BPG – and that could go and interact with it. So, I want to have a whole array of molecules that can interact with each other and be able to show the interactions between them and just make it a bigger scale.
Ally: Yeah, expand.
Stephen: Yeah. That’s pretty much where I’m going from here. Because, honestly, it’s pretty simple. I mean the same idea can be applied for all the others. So, pretty much almost there.
Ally: That’s so cool. So, I know that you kind of talked about this a little bit when you were talking about how you connected with the DKC, but tell us a little bit more about how you got interested in this project and like how you decided to take it from just doing it in the class to continuing it afterwards.
Stephen: Yeah. So like I was saying, in the class biochemistry of proteins, which is great class if anyone’s interested in taking that, but besides the point, in that class we were – we had a project where we had to print off a molecule and we’d actually present it here at the research and creativity day. So, I did that, and I printed off a molecule, but I wasn’t satisfied with it because the models that you can get on the protein database, like I was talking about, aren’t really, like I said, you can look at them, but you’re not really going to know what it is. Being able to edit them in CAD really shows off more, especially for if you’re showing it off to someone who doesn’t really know much about this topic. You can again, like I was saying, take it apart. And I felt like the models that were online never really went further than this is the model. Again, like I think it just looks like a glob. Honestly, I don’t think it looks anything more than that. So, that’s why I wanted to go further. And then I got introduced to Cartland and Shannon here and they were like, “Yeah, you can do a fellowship.” And I was like, “Oh my Gosh, what is that?” And the rest is history. So, that’s pretty much how it all happened there.
Ally: Cool. So, had you ever used any kind of CAD software before?
Stephen: No, no. No CAD software. My dad uses CAD for his job, so that was a very very useful resource there. But in terms of everything, before taking the biochemistry of proteins class, never touched 3D printers, never touched CAD, none of that stuff and I just jumped into that.
Ally: Cool, yeah. Well, so, it seems like you’ve learned a lot of this.
Stephen: Oh my gosh, yes, so much. And honestly, I felt like I was really bad at CAD at first, which is why it took me so long just to get to this point. Which honestly, I don’t think is very far, but it took me a long time to get here. But yeah, I had zero expertise with any of this stuff.
Ally: It’s also a kind of software where you kind of have to change the way you think about things because it is so, so different. The way that you’re shaping things is, you know, it’s on a completely different sort of plane.
Stephen: Yes.
Ally: It’s very impressive that you’ve gotten this far.
Stephen: Thank you. Thank you.
Ally: Congratulations. Have you had any specific challenges over the course? I know you’ve talked a little bit about, just like even just learning how to do it in the first place, being sort of a challenge, but what have you had to overcome and what have you learned through doing that?
Stephen: So, I’d say the biggest challenge that I’ve been having is working with the printers because it’s one of those cases where you can do everything right and things can still go wrong. That’s the biggest challenge that I’ve been having. Like I said, with the CAD, I’ve had the resource of my dad. There’s plenty – oh my Gosh – plenty of resources online like on YouTube and stuff like that that you can go onto. And you can pretty much learn the basics of CAD pretty rapidly with all the resources online. And then also with the printing software, there’s a whole like subreddit on their website that you can go to and get information from. But again, you can do everything right and it still doesn’t go right. For example, I’ve been trying to print with a soluble filament since the start of the project and I still have not been able to get it to print. It just gets jammed up into the extruder in the printer, or it absorbs too much moisture in the air, which I never even thought was going to be a problem, but that was a problem, and we had to get a whole new filament. We actually just bought a filament dryer recently. And there’s just been all these problems that are I feel like are outside of my reach. But again, I feel like there’s a way to get through this. I just haven’t gotten there yet.
Ally: Yeah. And in those situations, are you trying to figure that out by yourself just kind of trial and error? Is that a call in Shannon and Cartland moment?
Stephen: It was definitely a moment where I wanted to call in Cartland and Shannon for help here, but even they don’t really have a lot of knowledge on this because again, at the start of this project, we actually had just bought the multi extruder printer, so no one here on campus knew how to use it. And I still feel like I don’t know how to use it, but at the same time, there wasn’t very many resources available to me, so it’s kind of a trial and error thing at this point. There’s a lot of things that you can do to try to make the soluble filament work. For example, you can increase the temperature of the extruder so that it comes out in a more liquid manner than before it would get clogged up. But if I increase the temperature, it would come out better. But then again, I’d run into a different error where the printer would just extrude filament everywhere and it wouldn’t stop extruding. So, then I was like, “oh, maybe the temperature’s too high.” So, there’s a bunch of different things that you can do to resolve this issue. One of the biggest ones I found was switching one of the filaments that I used. I used PLA which is the normal filament that everyone pretty much uses for printing and then PVA, which is the soluble, but I switched to using PETG which is a different filament with the soluble because they have a closer melting temperature and it doesn’t require such a change in temperature when you’re making the transition to different filament. There’s a bunch of different things that I’ve tried out. Nothing’s worked perfectly yet, but there have been things that I’ve made progress on.
Ally: Yeah, that’s – I’ve been hearing sort of, you know, grumblings about the soluble filaments.
Stephen: It’s such an issue.
Ally: I mean, I feel like that’s one of those things where it’s like it’s so cool if it works, but getting it to work is so much effort.
Stephen: Yeah, because, I mean, if I can get the soluble to work, I mean the models that I’m making, they’re so intricate. I mean, there’s so many lumps and bumps and there’s interior that actually have detail on the inside. So, when you’re using the normal non soluble filament and you have all these supports on them, you have to pick those all off. And during the picking process, part of the model can break or doesn’t come off very neatly and it just messes up the model in general. So having the soluble, you just throw it in water and be done. Sounds great, but I haven’t gotten it to work yet.
Ally: Yeah. And also, I was looking at your posts and looking at the amount of organic supports that you had.
Stephen: Yes.
Ally: It’s one thing to even learn how to use CAD, but then to have to maneuver around an oddly shaped print, which is what you’re doing. You know, with these models, they are not like a square you know?
Stephen: Yeah, right. Exactly. And the organics have been a huge help actually. I never even knew about them, and I just tried to use them recently. And it was a great, great idea because it really really helped out. And if you looked in one of my posts, I gave a generic image of the organic supports from a different project that someone else online was doing and it was like 3 little branches of the supports, but for mine there was like 50 different ones.
Ally: Yeah, it was like a web!
Stephen: Yeah, it was like a web. It was a whole forest compared to like 3 trees. So, it was crazy.
Ally: And you can check those out. I will link the posts to this. So, people will be able to see what we’re talking about. Okay, what for you has been the most rewarding thing?
Stephen: CAD. CAD for sure. CAD. I feel like even outside this project there’s so many things you can do with CAD. But once you master CAD, and you start getting all of the key shortcuts and stuff like that, and you’re like running through CAD, it’s very, very satisfying for me. And I’m really glad that I learned CAD through this. But CAD has definitely been one of those things where I’ll just go back to it just to mess around with different ideas that I have and it’s just so much fun. I don’t know why, but I just love CAD so much now. So, it’s definitely been one of the best things I’ve taken away from this. The printing has been nothing but frustration, I will admit. But the CAD’s been great.
Ally: So, once you’ve printed all you want to print, what’s the next step for what you’re planning to do with them?
Stephen: So, I really want to make the models that are used in the classes that that I’ve taken here at UMW. For example, hemoglobin was a really, really big one in our biochemistry classes. We take probably a whole 2 units to really talk about hemoglobin. And honestly, for me personally, as a visual learner, I think that if a teacher used this in-person and was able to show me, I would appreciate its structure during the class way more. Another example is cell bio – that’s biology 340 here. There’s an example that we use where we’re talking about cancer and BCR-ABL, and this is with, I think acute myeloid leukemia. And the drug that they use to treat that and the protein that it affects is BCR-ABL, and essentially, it shows off the interactions of the drug with the protein and it basically stops the effects of some of AML. And we talked about that for probably a whole chapter. Being able to have a model to show off that, you know, having the drug which is called Gleevec, interact with the protein blocks ATP from binding to it. And having a model to show that off versus just saying it out loud, I feel like is a big difference for me personally, maybe not for others. But I feel like it would be a big, big improvement and I feel like there’s a bunch of these types of models that you can print for loads of different classes here that I just feel like would help in the teaching process. And that’s kind of my final goal and where I’d want to take it further, if I had the time.
Ally: Yeah, especially those processes that, you know, aren’t happening externally that you can’t really see without, you know, looking microscopically at what’s going on. To have a physical way to look at that in the classroom, I think yeah, would be great.
Stephen: Yeah, for me personally, I think I’ve always been a visual learner. I think that it really shows it off better because I don’t – I never appreciated almost any of this to be honest, especially with hemoglobin, the protoporphyrin rings. I never appreciated how they were integrated with the protein structure. I never appreciated any of that until I actually got my hands on models.
Ally: It’s kind of like you’re doing a reverse magic school bus where instead of going in, you’re like taking it out.
Stephen: Oh my gosh, yes! I literally am. I’m taking the idea and making it big. Yeah, you’re right. I am reverse magic school bus-ing. That’s awesome.
Ally: Okay, so something that we like to ask our seniors is do you plan to continue on with doing this after graduation in any capacity?
Stephen: I honestly, will have to say no, to be honest. Because, there’s a bunch of different things. This is definitely very, very fun for me right now, but I don’t think I’m gonna have time to do any of this later on. I think that there is promise with the 3D printing just as something that’s just fun, I mean. I’m not super into Warhammer 40K, but there is a large group of people that print out minifigures for a lot of different things, and I think having a 3D printing skill would be just helpful to have. So not necessarily sticking with this exact same thing, but I definitely would take these skills and apply them in other places for sure.
Ally: Yeah. That’s awesome. All right. One last question for you.
Stephen: Oh.
Ally: Would you recommend that people do a fellowship with the Digital Knowledge Center?
Stephen: Absolutely, absolutely. I would say that it’s worth it on so many levels. If you have any type of skill that you want to learn, I mean, doing the fellowship really motivates you to want to learn this new skill. And not to mention the resources that are provided to you by the DKC really make it possible. And it makes it feel more real. I never thought I would really get any progress on the 3D printer, but Cartland and Shannon have been immensely helpful for me. I think anyone who wants to learn a new skill should definitely do the fellowship here for sure.
(Outro music comes in and fades out)
Ally: This has been the Digital Creator Podcast. You can find a transcript of our conversation and more about this project below. This podcast was produced by me, Ally Hamilton, and edited by Angela Payne with help from the resources at the Digital Knowledge Center. Are you interested in becoming a digital creator? Do you have a cool project you want to share? Go to dkc.umw.edu for information on how to get started. Thank you for listening.
(Outro music fades back in)
For information on how to apply for a fellowship visit the DKC site.
Reply